AI integration (MCP)
PxlMonk can act as a local MCP server, letting an AI agent — Claude Code, Claude Desktop, Cursor or VS Code — browse your library and run edits and exports for you. Open Settings → MCP to set it up.
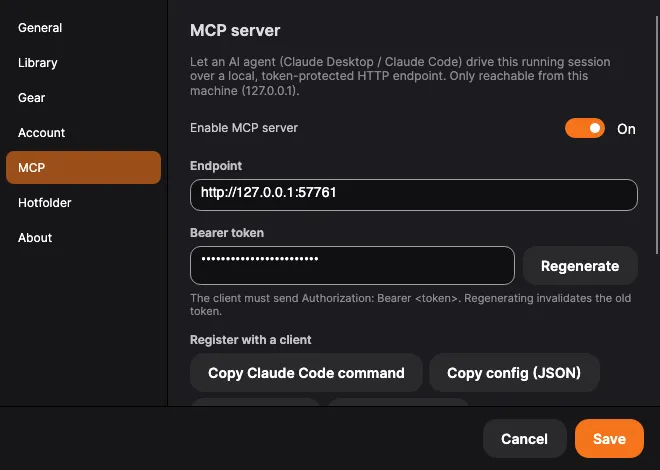
Enable the server
Section titled “Enable the server”Turn on Enable MCP server. PxlMonk starts listening on a local endpoint
(http://127.0.0.1:<port>) and shows a bearer token. A client must send that token as
Authorization: Bearer <token>. Use Regenerate to roll the token — that immediately
invalidates the old one.
Connect a client
Section titled “Connect a client”Under Register with a client, pick your tool:
- Copy Claude Code command — copies a ready-made
claude mcp add …command; paste it into a terminal. - Copy config (JSON) — copies a config snippet for clients that use a JSON config file.
- Add to Cursor / Add to VS Code — opens the editor and registers PxlMonk in one click.
These register a launcher that starts PxlMonk on demand, so you don’t paste the token into client config yourself.
Control what the agent can do
Section titled “Control what the agent can do”The capabilities checkboxes are your permission surface — grant only what you want:
- Edit — let the agent change develop settings, and set a photo’s rating, flag, colour label and tags.
- Export — let it export photos.
- Destructive — allow destructive actions (like deleting).
Leave a capability off and the agent simply can’t do it.
It can find the photos to work on the same way you would: by rating, flag, colour label, tag, camera, lens, capture date, album, or a word in the filename — or by simply taking whatever you currently have filtered on screen.
What it can change in Develop is the full set of sliders: exposure and white balance, tone and colour, clarity, structure and dehaze, sharpening and noise reduction, vignette and grain, and the colour or black-and-white treatment — plus the per-colour HSL adjustments, the black-and-white mixer, colour grading and the tone curves. It works in the same −100…100 scale Lightroom uses, so a value you ask it for means what you expect.
It can also apply your presets, LUTs and camera profiles, and switch lens correction on or off — always choosing from what you actually have. A name it invents is refused with the real list rather than quietly doing nothing.
And it can file photos: put them into albums or take them out, make a new album, and make another version of a photo to try something in without touching yours. It never deletes anything — taking a photo out of an album leaves the photo where it is.
The automatic corrections are open to it too: it can straighten a photo, level architecture automatically, set the crop’s aspect ratio, run the dust removal, and convert a film negative.
It can also run the AI noise reduction — not merely switch it on. Those are two different things, and the difference is minutes: switching it on records the decision, while producing the frame it refers to means running the model over the whole photograph. Ask an assistant to denoise a photo and it now waits for that to finish, in the same task area you would watch yourself, and tells you when it is done or if you cancelled it. A photo that was denoised before is not denoised again.
And it can hand you a finished mask. It cannot paint — a brush stroke over an API is coordinates without meaning — but it can look at a photograph, work out where the sky or the subject is, and deliver that as a selection you then adjust yourself. The mask arrives as its own layer, combines with ones you painted, and survives a restart.
It can also rasterise a mask you painted — that is what lets it work on your selection rather than only beside it. Your strokes are not consumed: the painted layer is switched off and stays, and you can switch it back on at any time.
With that the loop closes: it can rasterise your mask, read the picture, refine it, and hand it back — replacing only masks it delivered itself. Yours it can read but never overwrite. The automatic levelling declines on a scene whose lines disagree, and says so rather than pretending.
Reading the develop settings now also lists the layers: what each one is called, whether it is switched on, how strong it is, and what its mask is built from — a gradient, a radial, brushwork, a lightness or colour range, or a delivered picture — including which parts you made and which it delivered itself. It is a description, not the mask itself; ask for a preview to see the result. Before this an assistant could not tell that a layer existed at all, so it worked over your local edits without knowing they were there.
What it needs from your licence
Section titled “What it needs from your licence”Without an active licence these tools are off. PxlMonk is read-only then, and an assistant would otherwise be a way around that — the tools set the same develop settings the window disables. Every one of them, including the read-only ones, answers with a note saying to import a licence.
The same goes for a function that appeared after your update window ended: the tool for it refuses and says so, exactly as the app does. Everything your licence covers keeps working, on any build.
Other settings
Section titled “Other settings”The Settings window also holds Library (managed/referenced, folder template, import defaults), Gear, Account (your licence tier), Hotfolder (auto-import a watched folder) and About.
Next steps
Section titled “Next steps”- Getting started — the basics.