From RAW to a finished JPEG
By the end of this tutorial you will have taken one of your own RAW files from the card to a finished JPEG: imported, white-balanced, toned, checked, and exported at a size you can send to somebody. It is the whole path through PxlMonk in one go, so that everything else you read afterwards has somewhere to attach.
What you need: PxlMonk installed with a library set up (see Getting started), a folder of RAW files, and an active licence — a running thirty-day trial counts, and PxlMonk offers you one the first time you start it.
How long: about fifteen minutes.
-
Import a folder
Section titled “Import a folder”Click Import… in the top bar and pick a folder of RAW files. PxlMonk lists what it found; confirm, and the photos appear in the Library.
Import a small folder for this — twenty or thirty frames. You only need one photo to work on, and a short import gets you to the interesting part sooner.
-
Pick a photo worth working on
Section titled “Pick a photo worth working on”In the grid, look for a frame that has something to fix. A shot with a colour cast, or one where the sky is bright and the subject is dark, will teach you more in the next two steps than an already-perfect frame will.
Double-click it. PxlMonk opens it in Develop, with the photo large and the filmstrip along the bottom.
-
Set the white balance
Section titled “Set the white balance”Click Develop in the right-hand rail if the tool panel is not already showing.
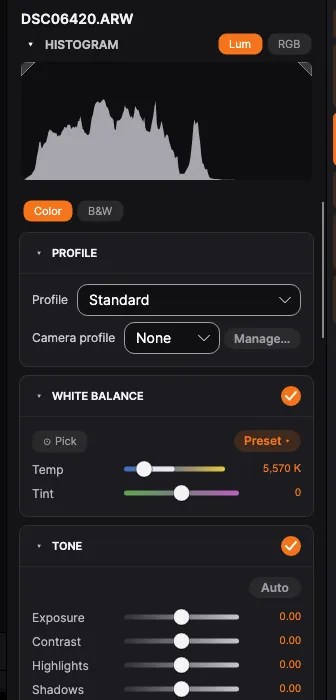
Under White balance, click Pick, then click something in the photo that should be a plain mid-grey — a concrete wall, asphalt, a grey stone. The whole photo shifts as PxlMonk works the lighting out from that one patch.
Aim for grey, not white. A bright white — a sunlit shirt, a paper sign — has usually run out of room in at least one colour channel, and those channels are exactly what the picker reads. It will tell you so and leave the photo alone, but that costs you a click: pick the grey wall instead. Very dark spots get the same answer, for the same reason in reverse.
If nothing in the frame is neutral, use Preset instead: Daylight, Cloudy, Shade, Tungsten. Or drag Temp by hand until the picture stops looking too orange or too blue.
Do this first, before touching brightness. Every later judgement about the photo depends on the colours being right.
-
Shape the tone
Section titled “Shape the tone”Below white balance are the tone sliders. Press Auto to get a balanced starting point, then adjust from there:
- Exposure — take the whole photo up or down until the subject sits where you want it.
- Highlights — pull it down where a sky or a sunlit wall has gone flat and bright. The detail is in the RAW; this is what reaches it.
- Shadows — lift it to open up the dark parts.
- Contrast — last, and gently. It multiplies whatever the other three just did.
Double-click any slider to put it back to zero. Nothing here is destructive: your RAW file is never modified, and Reset all edits returns the photo to how it opened.
-
Check what you actually changed
Section titled “Check what you actually changed”It is easy to talk yourself into an edit. Press \ to flip the whole frame between your version and the untouched one.
If your version does not clearly win, that is worth knowing now rather than after you have exported it. Go back to step 4 and take some of it off — beginners overshoot Contrast and Shadows more than anything else.
Then zoom to 100% and look at the darkest part of the photo. Lifting shadows brings up the noise that was hiding in them; if it looks speckled, that is what noise reduction is for.
-
Export it
Section titled “Export it”Right-click the photo — in the filmstrip or back in the Library — and choose Export….
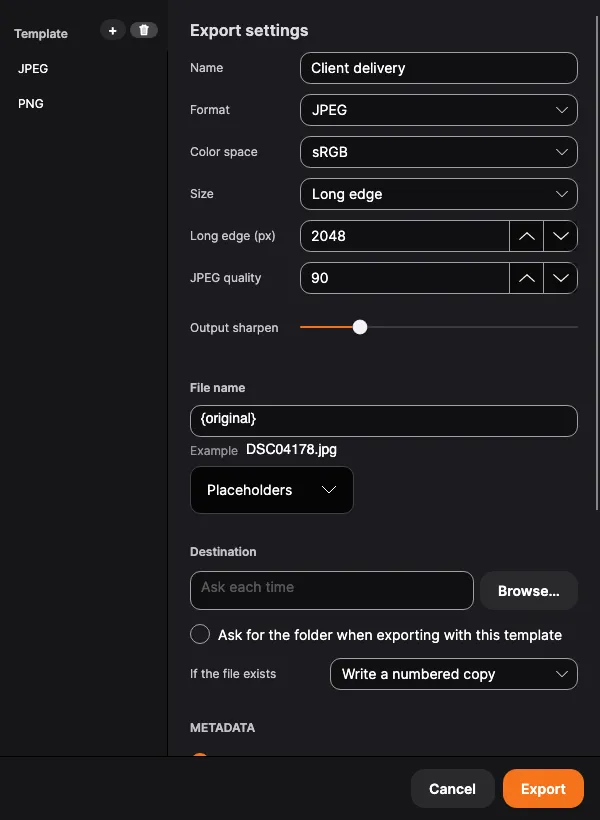
For a JPEG you can send somebody:
- Format — JPEG.
- Long edge — around 2048 px. Plenty for a screen, small enough to e-mail.
- JPEG quality — high, but not maximum; the last few percent cost a lot of file size and nobody can see them.
- Output sharpen — leave it on. It compensates for the softening that resizing causes.
Pick a destination folder and export. That JPEG is a new file — your RAW is untouched and stays in the library with your edits attached to it.
What you should see now
Section titled “What you should see now”A JPEG in the folder you chose, with correct colour, a subject that is neither too dark nor blown out, and no obvious noise. Open it outside PxlMonk to confirm — it should look like what you saw in the editor.
Back in the Library, the photo carries your edits. Re-open it any time; nothing you did was baked in.
Where to go next
Section titled “Where to go next”You just used a fraction of the editor. The things that pay off next, roughly in order:
- Organizing your library — rate and flag as you go, so you find the keeper instead of scrolling for it.
- Transform — crop and straighten. Often does more for a photo than any slider.
- Presets — once you have made the same edit three times, save it.
- Masking — when the photo needs the sky darker but not the subject.
- White balance & tone — the full reference for every control you touched here, plus colour grading, HSL, clarity and sharpening.