Exporting
When a photo is ready, export it to a standard image file you can share or print. Select one or more photos (in the Library or the filmstrip), right-click and choose Export….
What exporting needs
Section titled “What exporting needs”Exporting needs an active licence. It is the one thing PxlMonk makes for you — a finished photograph with your edits rendered into it, at the size and in the format you asked for — so with no licence, Export… opens the licence dialog instead of running.
Your own files are never locked. Right-click and choose Save the original file… to copy the file exactly as it arrived: byte for byte, keeping its own extension, so a RAW stays that RAW and any other program can open it. That works with no licence, with an expired trial, always.
Export settings
Section titled “Export settings”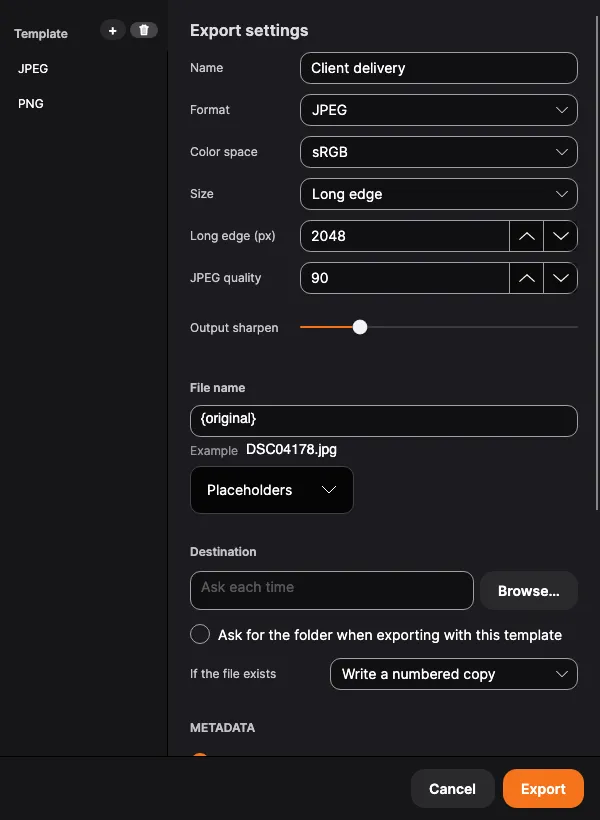
- Format — JPEG for sharing, PNG where you need lossless with transparency, or TIFF 8-bit where a print shop asks for TIFF, or TIFF 16-bit (master) for the file you finish somewhere else. The 8-bit one is a delivery format like JPEG: it takes the size and the colour space you set. Both are compressed losslessly.
- Color space — sRGB for the web and for anywhere you do not know what will open the file, Adobe RGB where a print lab or a picture desk asks for it, Display P3 for wide-gamut screens. Whichever you pick, the file carries a matching colour profile, so a reader does not have to guess.
- Size — Original size keeps the photograph’s own resolution; Long edge scales it down to the length you set below. Neither ever enlarges a photograph.
- Long edge (px) — the length the longest side is scaled to. Only used by the Long edge size.
- File name — how the exported files are named, built from the placeholders below. The example under the field updates as you type, and the extension is always added for you.
- Destination — the folder this template writes to. Leave it empty and PxlMonk asks each time.
- Ask for the folder when exporting with this template — for a template that has a folder but should still ask: the stored folder becomes the starting point of the picker instead of the answer.
- If the file exists — write a numbered copy (nothing existing is touched), overwrite, or skip the photograph. Skipped photographs are counted and named in the result, never silently left out.
- JPEG quality — the compression level for JPEG output.
- Output sharpen — a final sharpening pass suited to the output size.
- Process at full resolution — off by default, and only does anything when the export is being scaled down. Off, PxlMonk works at the size the file will be, which is what makes a web-sized export from a big camera quick. On, it works through the whole photograph at its own resolution and scales down at the very end, which keeps a little more of the finest edge detail and takes considerably longer. On a 150-megapixel photograph exported at 2048 pixels the difference is a factor of forty in time. Turn it on when you are exporting one photograph you care about; leave it off for everything else. (darktable calls the same thing high quality resampling.)
The 16-bit master behaves differently from the other two on purpose: it is always written at full resolution, so neither the size nor the colour space applies to it, and it carries 16 bits per channel in a wide-gamut space rather than 8 bits in sRGB. That gives a retoucher or a print lab room to work that a JPEG does not have. It also embeds a colour profile describing that space — without one, anything opening the file would read those wide-gamut numbers as sRGB and the picture would come out visibly wrong.
File-name placeholders
Section titled “File-name placeholders”A template is ordinary text with placeholders in it. They are the same words in every language, so a template keeps working when you switch the interface.
| Placeholder | Stands for | Example |
|---|---|---|
{name} |
the name you gave the photograph — otherwise its file name | Bride and groom at the lake |
{original} |
the source file’s name, without its extension | DSC04178 |
{n}, {n:001} |
a number counting up through this export; the zeros set its width | 7, 007 |
{capturedate}, {capturedate:yyyy-MM} |
when it was photographed | 2026-08-10 |
{exportdate} |
when it was exported | 2026-08-11 |
{filetype} |
jpeg, png or tiff — useful as a folder |
jpeg |
A slash makes a folder inside the destination, so {filetype}/{original} files JPEGs and TIFFs apart.
There is no placeholder for the extension: it always matches the format actually being written, so a file
can never claim to be something it is not. A template can only ever write inside the destination folder.
The number counts in the order the grid is sorted, starting at 1, and starts again with each export.
Metadata
Section titled “Metadata”Include metadata decides whether the exported file carries anything about the photograph besides its pixels. One switch covers all of it: camera, lens, exposure and capture time, plus whatever you put in the fields below.
Turn it off and the file goes out anonymous — useful for a screenshot, a mockup, or anywhere you would rather not say what you shot it with.
The colour profile is never affected by this switch and always travels with the file. It is what tells other software how to read the colours; stripping it would not make the photo more private, only wrong.
- Creator — who made the photograph.
- Copyright — the notice, e.g.
© 2026 Jane Doe. - Usage terms — what the recipient may do with it. This is the field picture desks and stock agencies read.
- E-mail / Website — where to reach you about licensing.
These fields are saved with the template, not globally, because they belong to the delivery rather than to you: a client gallery, a stock submission and a social post carry different terms, so each can have its own template.
Camera data comes from the photo itself. For a film scan it is the camera and lens you recorded for the negative — not the body you digitised it with. The exported file also describes itself rather than the original: crop it, and the dimensions written are the ones you exported.
Export templates
Section titled “Export templates”Save a set of export settings as a template so you can reuse it in one click — for example a “web JPEG, 2048 px” template and a “full-size TIFF” template. Pick a saved template from the Export with menu.
Two are already there the first time you look: JPEG and PNG, both writing the photo at its own resolution — JPEG at 80 % quality, which is the everyday delivery, and PNG where you need no compression at all. Neither knows where to write, so both ask for a folder the first time; give one a destination and it stops asking. They are ordinary templates: change them, rename them, or delete the one you never use, and it stays gone.
Next steps
Section titled “Next steps”- Getting started — back to the basics.
- Developing your photos — the full editor.