Analog film development
PxlMonk has a dedicated workflow for scanned film: it inverts negatives, removes the orange film base, and gives you film-specific tone controls — all non-destructively.
Mark the photo as a scan
Section titled “Mark the photo as a scan”First, in the Info panel, turn on This is an analog scan (film negative / slide). That unlocks the Film tab in the right-hand rail and relabels the camera/lens rows as your scanning rig.
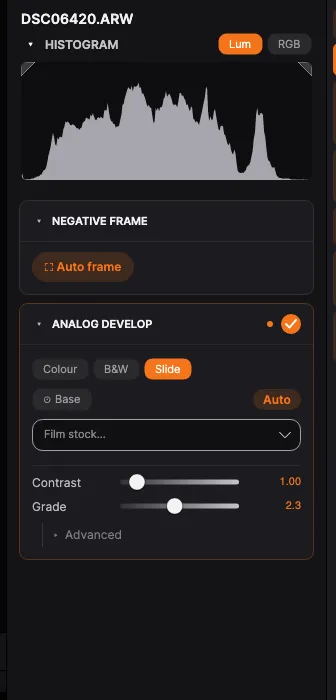
Convert the scan
Section titled “Convert the scan”Open the Film tab and switch the Analog develop section on — the switch in its header. PxlMonk inverts the image and balances it. Then set the type of original:
- Colour — a colour negative.
- B&W — a black-and-white negative.
- Slide — a positive slide (no inversion).
Use Auto frame to detect and crop to the film frame, and Base (with Auto balance) to sample and neutralise the orange film base.
Photographing a whole strip works too — Auto frame cuts at the gaps between the frames, whether they show clear film or the bars of the holder. If the frames sit almost edge to edge it can catch part of the neighbour; drag the handles to the one you want.
If there is no border to find — a borderless scan, or a picture that was never film — Auto frame leaves the photo exactly as it is.
Film is rarely laid down perfectly straight, so the frame can sit at an angle, and Auto frame sets that angle for you. To adjust it, drag anywhere outside the frame and it turns. Dragging inside moves it, the handles resize it — all in the frame’s own direction, so a tilted frame resizes along its own edges rather than the screen’s.
Turning the frame here aligns it to the film, not the picture: it decides which part of the scan is your photograph, so the density is measured over film alone rather than over a corner of rebate. Straightening the picture is a separate thing, under Transform, and stays yours to set.
Fine-tune the look
Section titled “Fine-tune the look”Under the film tone controls, shape the result:
- Contrast and Grade — overall contrast and the tone grade.
- Red γ / Blue γ — per-channel gamma to correct colour crossover.
- Pick a Film stock to emulate a particular film’s response.
Next steps
Section titled “Next steps”- White balance & tone — further adjustments after conversion.
- Exporting — save the finished positive.